This page marks the beginning of the Organic Gardner (OG) IoT Project Milestone 1 development! If you want to program along but have not yet worked with the Go programming language check this intro: Getting ready to Go.
A Brief About MQTT
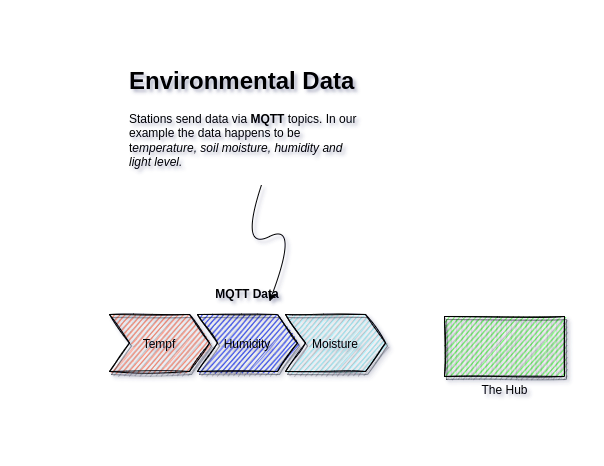
MQTT is the messaging protocol that a Collector will use to periodically publish sensor data (like temperature and humidity) to the IoT Gateway. MQTT will also be used to signal when the Control Station or Controller will respond to commands to turn a sprinkler pump on or off.
Why MQTT
MQTT fits nicely into compact hardware and embedded systems where RAM and compute power are limited. Which is one reason why it is ubiquitous in the IoT applications.
MQTT is easy to use both programming and operations. It compiles into a small and fast binary. MQTT is built atop of TCP the Internets workhorse protocol which also means it is reliable and adapts well to busy or low bandwidth networks.

MQTT Architecture
MQTT has three primary components: a broker, publishers and subscribers. Publishers send messages to Brokers, Brokers then forward the message to Subscribers.
Messages are segregated by Topics that resemble the path hierarchy
of a file-system. For example the Collector sends the current
temperature to the topic data/temperature and the topic
data/soil-moisture is used for moisture as examples..
Similarly the pump for a sprinkler system would subscribed to the topic
ctl/sprinkler waiting for commands to turn a sprinkler on and
off.
That was just enough description of MQTT to get us started. As the project progresses we will dive into more detail of MQTT particulars as they effect our project. Now let’s actually add MQTT to the IoT Gateway as required by the first Milestone.
Import the Paho MQTT Library
The third party package Paho MQTT Go is a nice little library that is going to make it easy for us to subscribe to the appropriate MQTT topics as well as enabling us to publish commands for the sprinkler controller.
First we need to do is import the package directly from it’s repository and with Go nothing could be easier! Just run the following command from the command line.
% go get github.com/eclipse/paho.mqtt.golang
Second the package must be imported into the application source code during compile time with the following line of code.
import mqtt "github.com/eclipse/paho.mqtt.golang")
As matter of fact here is the entire snippet for importing the MQTT package and connecting to the MQTT with this code:
We can now connect to a MQTT Broker, which by default will be located on the same host running our IoT-Gateway (i.e. localhost). However that may not always be the case, the gateway may need to connect to an external broker.
For this reason we are going to make the brokers address configurable. This leads us to a brief introduction to the Go builtin flag package allowing us to easily create a command line argument that is capable of setting the broker configuration variable.
The Configuration Struct
I typically create a struct called Configuration and a
single global variable (singleton) called config to house all
the programs configuration variables. Like so:
import (
    "flags"
)

typedef Configuration struct {
    Broker string           `json:"broker"`
}

var (
    config Configuration
)

func init() {
    flags.StringVar(&config.Broker, "broker", "localhost", "Set the MQTT Broker")
}

func main() {
    flags.Parse()

    mqtt_init(config.Broker)
}
If you would like to read more about the configuration struct as well as a discussion saving and reading the configuration structure from a file and a quick introduction to Go’s twist on “Object Oriented” programming check out this article on the Go Config Struct.
Now we have turned the config.Broker variable into a command
line argument that defaults to localhost. Meaning if we run the
command as:
% ./iot-gateway
It will automatically connect to the MQTT broker running on
localhost. Otherwise we can have our IoT Gateway connect to a
public MQTT broker for example:
% ./iothub -broker mqtt.eclipse.org
Using the command above all of the data from the topics we subscribe
to will be published from the global broker mqtt.eclipse.org.
MQTT Topics for OG
The IoT-Gateway in it’s first version will of course collect environmental data including temperature, humidity, soil moisture and luminescence from various sensors scattered about.
As mentioned earlier MQTT topics are strings with a hiearchal structure very similar to a file-path. We are going to take advantage of this fact and structure our topics such that we can extract the StationID and SensorID directly from the topic itself.
ss/data/{:stationid}/{:sensorid}
Where the :stationid and :sensorid are variables to be
replaced by the values extracted from the topic path-like strings.
For example a station with an ID 10.11.4.22 will publish the
temperature in Fahrenheit with a sensor ID of tempf results in the
data topic
ss/data/10.11.4.22/tempf
MQTT and Wildcards
Lucky for us MQTT topics can be subscribed to using the ‘+’ wildcard symbol to capture the StationID and SensorID even though the hub did not know about any of these stations or sensors before they were published by the Collection Station.
By subscribing to a single Topic using wildcards we can be ensured of receiving data from all stations and sensors with the single call to hub.Subscribe() below:
hub.Subscribe("data", "ss/data/+/+", dataCB)
Where the above call gives our subscription the name “data”. The
path ss/data/+/+ contains two wildcards represented with the
+ character. The third argument is the callback that will be
invoked every time a value is published to one of the above topics.
Here is the Subscribe() function from the IoT gateway:
func (s *Hub) Subscribe(id string, path string, f mqtt.MessageHandler) {
	sub := &Subscriber{id, path, f, nil}
	s.Subscribers[id] = sub

	qos := 0
	if token := mqttc.Subscribe(path, byte(qos), f); token.Wait() && token.Error() != nil {
		panic(token.Error())
	} else {
		if config.Verbose {
			log.Printf("subscribe token: %v", token)
		}
	}
	log.Println(id, " subscribed to ", path)
}
and the callback function that is invoked every time new data arrives:
// TimeseriesCB call and parse callback data
func dataCB(mc mqtt.Client, mqttmsg mqtt.Message) {
	topic := mqttmsg.Topic()

	// extract the station from the topic
	paths := strings.Split(topic, "/")
	category:= paths[1]
	station := paths[2]
	sensor  := paths[3]
	payload := mqttmsg.Payload()

	consumers := hub.GetConsumers(category)
	if consumers == nil {
		log.Println("DataCB no consumers for ", topic)
		return					// nobody is listening
	}

	log.Printf("MQTT Message topic %s - value %s\n", topic, string(payload))
	switch (category) {
	case "data":
		msg := Msg{}
		msg.Station = station
		msg.Sensor = sensor
		msg.Data = payload
		msg.Time = time.Now().Unix()
		for _, consumer := range consumers {
			consumer.GetRecvQ() <- msg
		}

	default:
		log.Println("Warning: do not know how to handle", topic)
	}
}
MQTT Handling Incoming Data
The callback shown above is pretty simple:
- Extract the StationID and SensorID from the MQTT topic
- Extract the value delivered
- Save the timestamp for when the data was received
- Use the StationID and SensorID to index the RAM Cache
- Send the
{timestamp, value}tuple to the RAM Cache consumer[1].
The Ram Cache consumer is a Go routine that receives the incoming Msg over a channel. We’ll talk about these novel Inter-Process Communication (IPC) mechanisms supplied by Go when we add Websockets during the 4th milestone.
Controlling Memory Usage
Following this algorithm our memory usage is going to increase in direct proportion to the number of stations, sensors and frequency of data publications.
Todo: in the future we’ll add configurations that will allow us control over how much data to keep in RAM and how long to keep it.
Controlling memory in sophisticated ways is an exercise for later. Until then we’ll just put a limit on the number of data points that can be kept, like say 1,000 so we don’t perpetually run out of memory before implementing more complex memory controls.
The Msg Data Structure
Data is reformatted into the following Msg struct by the
dataCB() callback for every new datapoint. The structure is
defined as
type Msg struct {
    StationID   string
    SensorID    string
    time.Timestamp
    Value       interface{}
};
The interface value allows for an arbitrary value type. For example Value can be an integer, floating point or a string formatted as JSON.
The Msg structure is fine for handling the immediate incoming
data and passing it along to a consumer, it is not efficient for
storing in memory for a quick API response. For this reason we need to
define a structure more appropriate for indexed retrieval defined below.
Internal Data Model
Data will be cached in RAM with the following format built from
Datapoint tuples {timestamp, value} as a series hanging from a
Sensor which in turn is part of multiple sensors associated with a
Collection Station.
With this model we can easily adjust the number of timestamps allowed per sensor to limit the amount of memory that will be consumed.
Testing the Hub
We now have enough code that we can build and test our fledgling IoT Gateway. First we will of course write the obligatory unit tests we all should be writing as part of our Software Development Process (SDP) with Test Driven Design (TDD)
Go and Unit Tests
We won’t go into any detail writing Go unit tests here as there are plenty of good resources on the net including the best place to start which is the Go testing package documentation itself.
The unit tests above can be considered white box tests implying that the test code has access to programs internal data structures and functions directly for testing.
System Tests with MQTT
System tests, however are considered black box test and operate completely outside the Gateway by accessing the Gateway’s external public API.
Mocking Collection Stations
Easy testing is one of the beautiful things about working with
protocols like MQTT and HTTP they are inherently mockable. We’ll use
the popular mosquito_pub MQTT publishing tool to mock the
Collection Stations (CS) that have not yet been developed as of this
writing.
To demonstrate a quick test of the hub we will add a -verbose
flag to print data as it is received. The data is then cached in RAM
and made ready for the REST API coming in the next article
(milestone).
To mock a Collector publishing temperature data all we have to do is run the following command:
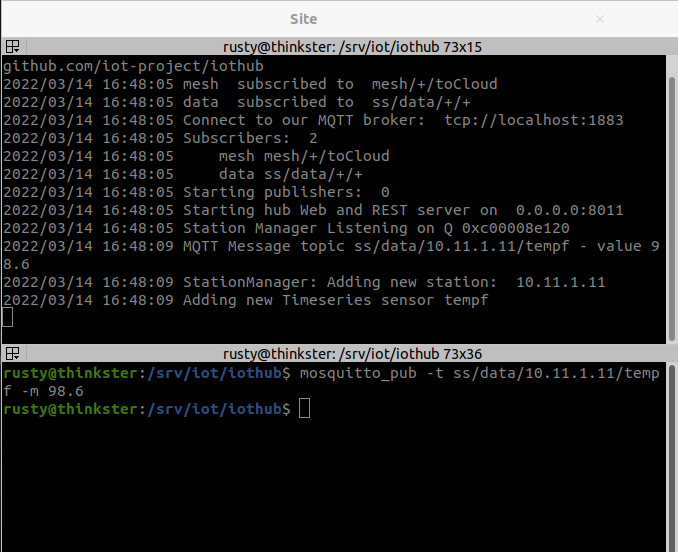
% mosquitto_pub -t ss/data/10.11.1.1/tempf -m 98.6
Our IoT-Gateway will pick up the fake data value 98.6 from
sensor tempf extracted from the topic
ss/data/10.11.1.11/tempf.
The upper screenshot shows logs from the IoT Hub starting up then
having just received it’s first data point from MQTT. The lower screen
shows the invocation of the mosquitto_pub command.
Victory!
In the above screen shot mosquitto_pub published the temperature
in Fahrenheit to the topic ss/data/10.11.1.11/tempf where the CS
station id is represented by 10.11.1.11. Likewise, the SensorID
is represented by the string tempf. The value passed in 98.6
degrees Fahrenheit.
We can see the Hub receiving the data and parsing the StationID and SensorID from the topic string. The data is parsed, formatted and temporarily saved in RAM.
HTTP REST Server Next …
The gateway now receives periodic data from one of more stations, each with one or more sensors. The data is reformatted and stored as a time-series in RAM.
Now it is time build our REST API to get the data out of the IoT Gateway.
In this next article we are going to import Go’s builtin
net/http package to setup our HTTP server that will in turn
handle our REST Endpoints. This same package will later allow us to
serve up the IoT Gateway web app.